Tuesday, January 24, 2012

Gorgeous Jewelry Organizer

My sister Shannon with Amazing Spaces showed me a great way to de-clutter your jewelry and add some beauty to your bedroom!  

She made a few for her room, some for her daughter's and together we made one for our mom! 
Here is what you will need:

  • Wooden frame (as large as you want it)
  • flat cork (you can find it in a 4 pack at various stores)
  • Fabric of your choice (try to make sure it isn't the kind that pulls easily)
  • Posterboard
  • Staplegun & staples
  • Scissors
  • String/twine or a picture hanger


First you will need to take all the stuff out of your frame.  Take the backing off, glass and all the paper out.  If it is an art piece instead of a picture frame you will need to take all the staples out as well:
  

Next you need to measure your cork to fit your frame.  We had a large frame and the 10 inch squares of cork weren't big enough.  So we measured how much more we would need and cut a strip to fit.
 
As you can tell the cork didn't fit to the bottom either so we did the same thing there.  Once we had all 4 pieces together we cut out doubles of everything to make our cork board twice as thick.   Here is what ours looked like so far:

Now that we know everything fits take the cork out of the frame for now.  Measure and cut out a piece of posterboard the same size as your total cork area (the same as the inside measurement of the frame).  Then place the cork on the posterboard one layer first.  Take your doubles and make your second layer so that none of the cracks line up.  Example: If your cork matches up on the left of the first layer make it on the right for the second layer.

Then staple the cork together and the paper to the cork.


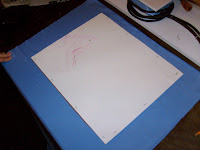
You aren't going to see this piece of posterboard later so we reused some her daughter's had colored.

Now time for the fabric.  Iron is to make sure all the wrinkles are out because you can't iron it once it is put together. Place the right side (if it has one) of the fabric down.  Place the cork side of your cork/posterboard creation down on the fabric.  Then cut the excess fabric away.  You will need about 2 inches or so of fabric all the way around.
 
Then fold the fabric over one side and staple it to the posterboard/cork.  Then pull the fabric taught (not super tight though, you don't want to stretch your fabric).  Staple the opposite side.  Then do the same thing for the top, then the bottom.  We folded the corners in before doing the top and bottom to make it look nicer.  


Between each section you might want to make sure there are still no wrinkles on the front and make sure your design (if you have one) is still centered.

Then place this inside the frame.  It might be a little tight because of the thickness the fabric adds but that's ok.  Then measure the width of the outside of your frame and measure a piece of posterboard to fit.  Staple that onto the frame.
 

Now that is is all stapled on, if any excess poster hangs off trim it with scissors or a knife.


Now the last step is to put a picture hanger on the back or staple a piece of twine to the back.

Tada!  All done!!  Now you can stick your earrings straight into the cork board (Shannon keeps her earring backs in a little box on her dresser).  Or you can use thumbtacks (decorative pretty ones!) to hang your necklaces and bracelets. 


 For more help organizing your home & life check out Shannon's facebook page: Amazing Spaces

Tuesday, January 17, 2012

Loofah Washcloths- an awesome way to wash!

I love the way my poofball (loofah) scrubs but I cannot stand how long it takes to rinse it out thoroughly!  So I came up with an awesome solution!  I made washcloths out of the poofball material. 

  
So how did I do it?  Well remember those looms you used as a kid to make potholders?
  
   
Well I took that idea and revamped it to make the loofah washcloths!
  
  
  I needed a larger loom so I took 56 nails and drove them into a board about 3/4 inch apart to make a 10x10 inch square loom.  And I took a cheap metal coat hanger, cut and bent it to make a supersize version on the weaving tool.  Sorry there are no pictures of that process, I did it a year or so ago.
  
Okay so here are all the supplies you will need for this process:
A large loom, a weaving tool, scissors & a poofball or two, if you want it to be two different colors.
  
  
First step is to untie the cord wrapped around the poofball.  Open up the poofball and if you can untie it thats best, otherwise cut it off.  Be careful not to cut the poofball itself though.  Then unravel the rest of the material.


Then cut loops about 1 1/2 inch - 2 inches wide. You will need 14 strips of each color or 28 of just one color.


Then stretch the loops from one end of the loom to the other until all 14 of the first color are on. Like below


Now it is time to weave the other color the opposite direction.  Take your weaving tool and put it under the first loop and over the next, then under and over & repeat until you get to the other side.  Then pull a loop through.


Next take the tool and run it OVER first, then UNDER, and repeat that until the end and pull the second loop through.


The third row will be under and over, 4th row over & under, continue alternating until you finish.


Time to crochet the edges.  To do this take a corner loop off of the nail.  Grab the other corner loop right next to it.  Put your crochet loop (weaving tool) through both loops.  Pull the first one over the second and back off the tool.


Then grab the next loop and put it on the tool.  Pull the previous loop over and off the tool.  Continue this process all the way around, continuing around corners the same way.


When you get to the very last loop grab the first loop with the tool and pull last loop over and off.  Now you can take the cord that was originally wrapped around the poofball and tie it onto this loop.  I find the cord is a little long so I cut it in half first and then tie it on. And Voila! You are all done!


My husband, best friends, best friend's dad, my mom & sister all use these too and think they are wonderful!  If you aren't too crafty I'm glad to make one and send it to you.  I should probably start an Etsy page soon.

Wednesday, January 11, 2012

Rugs to Riches: Cute Purse made from a Rug!

I made a great craft with my sister Tuesday... but it is a present, so I can't post it quite yet. 
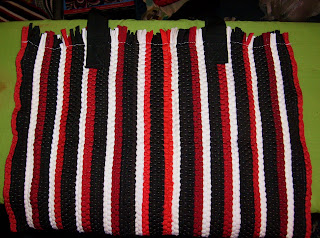
So instead check out this cute purse I made last night!


I bought a few of these rugs from the dollar store over a year ago with the intentions of making purses for me and my girlfriends.  Well I just now made one.  I guess I needed motivation and wanting to write another article for the blog gave me the excuse I needed.

So check out your local dollar store for these rugs (I just saw them there the other day so I know they still have them).  Here are the supplies you will need:

 
  • one rug
  • one mini-rug purse (I found them at the dollar store, too) or another rug to cut up
  • fabric to line your pocket and make your straps
  • a reusable grocery bag to cut up
  • sewing machine, iron, thread, scissors, strip of yarn, yardstick, measuring tape
Now time for the directions!  First thing we will make is the pocket (I find it easier to put it on before I sew the bag all together).  So take the small purse and rip open the seams on the sides and take off the straps. If you can't find this mini purse just cut out a square from an extra rug.
Now cut out a piece of fabric the same width as your pocket and about an inch or so taller. Fold over the top piece one time about 1/2 inch.  Fold it over another 1/2 inch overlapping the pocket material now. Sew that in place with a straight stitch at the bottom and a zig-zag stitch in the middle.  This keeps the rug material from coming apart later. It should look like this:


 Next sew a straight stitch down either side to hold the fabric to the rug material. & then flip it over and sew it onto the front of the rug about 2 inches from the top and centered width-wise. 


Next up are the straps.  Again I find it easier to put them on before sewing the sides of the purse together. So take the plastic rectangle out of the bottom of your grocery bag (we'll use it later) and cut the sides off the bag.


Then cut two long strips (from one handle end to the other) about 1" wide.  If you like wider straps feel free to make them cut this wider.  If you don't want to cut up a grocery bag you can use any thick kind of material to make your purse straps stronger.  And if you don't want to make straps they sell strap/belt material at the fabric store.  That would make this project super simple!  Anyways, back to making straps.  Next you will need to cut long strips of your other fabric the same length as your liner material and 3 inches wide (or more for wider straps). 


Then fold fabric in half long wise (right sides together if you have a pattern on it) and sew a straight stitch about 1/4 inch from raw edges the entire length. Then you will have to turn it right side out.  Some people like to sew a thread in one end before sewing the length so they can just pull the thread to turn it out.  I pinned it in, same difference, but make sure the yarn is longer than the strap!


After you have turned both straps right side out, iron the seam flat.  Then take the grocery bag strips and pin a small piece of yarn to one end and tape that onto the end of your yard stick.  Use this to thread your strip of grocery bag fabric through the strap fabric.


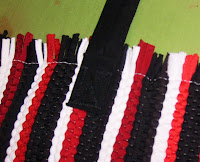
Now fold over the end of the lined straps twice, one inch each time (I did a little more because my straps were too long and instead of cutting it I just used it). Then sew the folded section onto the inside of your rug in an X pattern.  My straps were 29 inches long and I sewed them about 6-8 inches apart.


 Finally it is time to sew up the sides up the purse! Fold your rug (soon to be purse) outsides together.  Pin sides together and sew up with a zig-zag stitch. 


Now you can stop there and turn it right side out if you want.  However I made with a flat bottom and more of a box design by sewing the corners flat.  This part is hard to explain so look at the pictures below first:


You are going to take the sides of the purse (still inside out) and grab the bottom corner.  Decide how wide you want the sides and bottom of your purse to be and sew that much across.  For me, by sewing about 3 1/4 inches in it made the length 6 inches.  Again this is hard to explain, so if the pictures don't make sense look at one of your other purses you have bought and see if it make more sense to you.
Once you have those two corners sewn across you are almost done!  Take the plastic bottom that came in the reusable grocery bag and cut it to fit the bottom of your purse.  Turn your purse right side out and put it in the bottom.  You can put it over the corner flaps or use them to hold the plastic down, whatever works for you.


Now you are all done!
Fill up your masterpiece and show it off!